Halo + OpenRestry 实现 SSL
使用 openresty 版本 1.27.1.2
注意:
openrestry 不要用应用商店里的,网络问题不好解决,容易访问不到
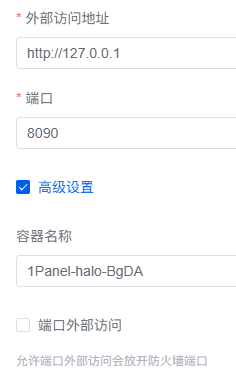
端口只能设置为 8090,使用自定义的端口不行(可能行,但是我一直失败。失败的原因可能是浏览器缓存的原因,设置完换浏览器试试。)
halo 配置:
配置文件
user  root;
worker_processes  auto;
error_log  /var/log/nginx/error.log notice;
pid        /var/run/nginx.pid;
worker_rlimit_nofile 51200;

events {
    use epoll;
    worker_connections 5120;
    multi_accept on;
}

http {
    include       mime.types;
    default_type  application/octet-stream;

    log_format  main  '$remote_addr - $remote_user [$time_local] "$request" '
                      '$status $body_bytes_sent "$http_referer" '
                      '"$http_user_agent" "$http_x_forwarded_for"';
    access_log  logs/access.log  main;  # 修改为相对路径

    sendfile   on;
    tcp_nopush on;
    tcp_nodelay on;

    client_max_body_size 50m;
    keepalive_timeout 60;

    gzip on;
    gzip_min_length  1k;
    gzip_buffers     4 16k;
    gzip_http_version 1.1;
    gzip_comp_level 2;
    gzip_types     text/plain application/javascript application/x-javascript text/javascript text/css application/xml;
    gzip_vary on;

    # HTTP 重定向到 HTTPS
    server {
        listen 80;
        server_name itokay.cn www.itokay.cn;
        return 301 https://$server_name$request_uri;
    }

    # HTTPS 主服务 - 修正 http2 语法
    server {
        listen 443 ssl;
        http2 on;  # 新的 http2 语法
        server_name itokay.cn www.itokay.cn;

        # SSL 证书 - 确保路径正确
        ssl_certificate     /opt/ssl/full_chain.pem;
        ssl_certificate_key /opt/ssl/private_pkcs1.key;

        ssl_protocols TLSv1.2 TLSv1.3;
        ssl_ciphers HIGH:!aNULL:!MD5;

        # 代理到后端
        location / {
            proxy_pass http://127.0.0.1:8090;
            proxy_set_header Host $host;
            proxy_set_header X-Real-IP $remote_addr;
            proxy_set_header X-Forwarded-For $proxy_add_x_forwarded_for;
            proxy_set_header X-Forwarded-Proto https;

            proxy_connect_timeout 60s;
            proxy_send_timeout 60s;
            proxy_read_timeout 60s;
        }
    }
}
网站私有访问
常见方案:
nginx 限制IP,但是小区很多人共用 IP,而且 ip 经常会变。
nginx 开启 Basic Auth 认证
搭建 vpn,用vpn 才能访问服务器
......
你电脑  ←→  Tailscale 内网  ←→  阿里云服务器
        (100.x.x.x 虚拟IP)
1、安装
curl -fsSL https://tailscale.com/install.sh | sh2、开启服务
sudo tailscale up弹出来这个,然后复制到浏览器打开登录。

点击Connect:
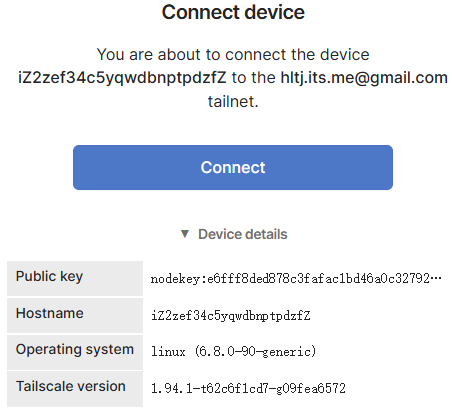
3、查看 IP
tailscale ip -4user root;
worker_processes auto;
error_log /var/log/nginx/error.log notice;
pid /var/run/nginx.pid;
worker_rlimit_nofile 51200;
events {
use epoll;
worker_connections 5120;
multi_accept on;
}
http {
include mime.types;
default_type application/octet-stream;
log_format main '$remote_addr - $remote_user [$time_local] "$request" '
'$status $body_bytes_sent "$http_referer" '
'"$http_user_agent" "$http_x_forwarded_for"';
access_log logs/access.log main; # 修改为相对路径
sendfile on;
tcp_nopush on;
tcp_nodelay on;
client_max_body_size 50m;
keepalive_timeout 60;
gzip on;
gzip_min_length 1k;
gzip_buffers 4 16k;
gzip_http_version 1.1;
gzip_comp_level 2;
gzip_types text/plain application/javascript application/x-javascript text/javascript text/css application/xml;
gzip_vary on;
# HTTP 重定向到 HTTPS
server {
listen 80;
server_name itokay.cn www.itokay.cn;
allow 100.64.0.0/10;
deny all;
# 不强制 https
# return 301 https://$server_name$request_uri;
location / {
proxy_pass http://127.0.0.1:8090;
proxy_set_header Host $host;
proxy_set_header X-Real-IP $remote_addr;
proxy_set_header X-Forwarded-For $proxy_add_x_forwarded_for;
proxy_set_header X-Forwarded-Proto https;
proxy_connect_timeout 60s;
proxy_send_timeout 60s;
proxy_read_timeout 60s;
}
}
# HTTPS 主服务 - 修正 http2 语法
server {
listen 443 ssl;
http2 on; # 新的 http2 语法
server_name itokay.cn www.itokay.cn;
allow 100.64.0.0/10;
deny all;
# SSL 证书 - 确保路径正确
ssl_certificate /opt/ssl/full_chain.pem;
ssl_certificate_key /opt/ssl/private_pkcs1.key;
ssl_protocols TLSv1.2 TLSv1.3;
ssl_ciphers HIGH:!aNULL:!MD5;
# 代理到后端
location / {
proxy_pass http://127.0.0.1:8090;
proxy_set_header Host $host;
proxy_set_header X-Real-IP $remote_addr;
proxy_set_header X-Forwarded-For $proxy_add_x_forwarded_for;
proxy_set_header X-Forwarded-Proto https;
proxy_connect_timeout 60s;
proxy_send_timeout 60s;
proxy_read_timeout 60s;
}
}
}ssl 只能是域名的,ip 不行的。
域名的解析不需要改,直接修改本地的就行了。
添加
C:\Windows\System32\drivers\etc\hosts

100.103.43.9 itokay.cn
100.103.43.9 www.itokay.cn
但是这样好像七牛云对象存储用不了,而且网站速度慢。
有 bug,nginx那样设置了,岂不是我随便打开一个Tailscale,就能连接上。
算了,不搞了。
Halo 备份问题
有以下两种烦人的情况:
有备份包,但是无法恢复,要么上传失败,要么恢复卡住,要么服务器卡死,总之就是不行。
halo 出现了莫名其妙的错误,无法启动,但是网站还没备份,不想丢数据。
第一种办法有点难搞,暂时不知道怎么解决,因为没有 mysql 的备份,所以建议备份网站的时候也备份 mysql。
第二种,在有mysql的备份的情况下
第二种情况:
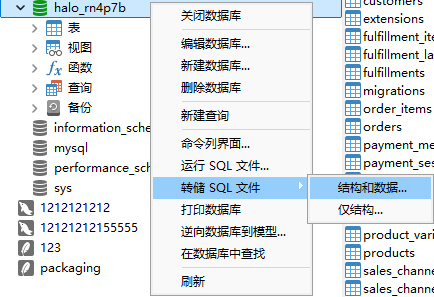
(1)别慌,先备份 mysql 数据表,使用navicat 转储数据库
(2)备份数据,/opt/1panel/apps/halo/halo/data,备份 data 这个文件夹
(3)在 1panel 中删掉 halo 这个应用,然后重新安装,等到网站出现初始化
(4)安装后把它的 data 删除,然后换成你备份的 data
(5)mysql 恢复之前的数据,使用 navicat 运行数据库文件来恢复数据
(6)大功告成